

For my images, I take advantage of Lightroom 90 % of the time so, it isn’t typically I create picture manipulations, however not too long ago I created a one as a result of I felt impressed to take action. I suppose it’s a illustration of arduous occasions. For the reason that entire creating course of is recent in my thoughts, I need to share what goes into creating one thing like the ultimate work from a number of pictures in Lightroom and Photoshop from sketch to the ultimate work. As all of us have extra time in entrance of the pc, why not attempt to do and study one thing new to stretch our talents. I received’t go into each little element of particular methods; that is an general take a look at how I create picture manipulations.
If you wish to study extra about my methods, try my video tutorial Day to Evening.
1. Making a sketch
After I’m creating a photograph manipulation, I normally begin it with a clean paper in entrance of me and draw one thing that involves my thoughts. I haven’t got any filters on what I needs to be creating; I begin drawing from a imaginative and prescient I’ve. I sketch a tough thought and determine whether it is one thing that I could possibly be creating. I imagine that when you could have created the sketch, it is important that you just additionally take the subsequent few steps on creating the work as a result of in any other case, you may find yourself dropping that momentum and imaginative and prescient you had within the first place.
Sketching ideas
-
Begin with a clean paper
-
Visualize how the ultimate picture would appear like and begin sketching
-
It would not matter for those who can draw or not, so long as you understand what you might be creating
-
Do not be afraid to create a number of sketches
-
Make notes on the paper if you cannot begin constructing the picture immediately

2. Choosing the photographs
I all the time begin by creating a set in Lightroom, so I’ve all of the chosen pictures in a single place. On this means, I do not lose my focus each time I’m going by way of the images. If within the making course of, I need to add one other picture, I can simply add it to the gathering.
After I undergo my images, I choose any image that’s something as I had roughly sketched and visualized. As a substitute of going by way of all my pictures, I normally have a imaginative and prescient through which pictures may work collectively, so on this case, it was fairly a fast course of to seek out the images for the ultimate piece. The one one which I had bother selecting was the individual within the body. In the long run, I selected one which was near what I needed to make use of and edited it later in Photoshop.
The photographs do not have to be excellent immediately. Nevertheless, utilizing related images with horizons roughly in the identical place and related lens used to take the image is a good way to attenuate any issues in a while when creating a photograph manipulation.
Choosing ideas
-
Choose pictures with related focal lenght
-
Use components of the photographs to create the general look
-
Visualize what kind of pictures would work collectively
-
Choose extra images than you suppose you could use within the last work
Utilizing collections in Lightroom CC is a good way to have the chosen pictures in a single place.
3. Creating the bottom
As soon as I’ve all the photographs I need to use within the assortment, I open them as separate good objects in Photoshop. I have a tendency to make use of good objects if I am unsure what I need to do with the photographs within the first place. Or if I do not know whether or not the images mix properly. Sensible objects are nice when you do not need to sacrifice the enhancing talents of the RAW information inside Photoshop. It makes your Photoshop information lots greater, however I nonetheless advocate utilizing good objects.
I then choose every of the pictures and transfer them into one Photoshop file. As I’ve a tough thought of how I need the photographs to be positioned contained in the body, I work out if I have to make modifications to the RAW information or if among the images will not mix effectively, and in that case, I want to pick out one other one.
As soon as I’ve the photographs in the appropriate locations, I shuttle between the images and alter the settings to match them collectively by double-clicking on every picture and enhancing the Digicam Uncooked settings. It is a tedious job, however an important one to make your manipulations look extra reasonable. I take advantage of the highway {photograph} as a base layer and as a place to begin and attempt to match the opposite pictures with it. As I need the picture to be fairly darkish, eradicating the colourful components of the bottom layer is essential.
As soon as I’ve all the photographs in place, I save the image, and since the file measurement was going to be enormous (11 GB), I used the PSB file format as an alternative of TIF. The Lightroom CC Traditional now helps PSB-files, which makes it simple to edit the file after you might be completed in Photoshop.
Why use Sensible objects?
-
You’ll be able to edit them inside Photoshop as RAW pictures
-
Extra flexibility to the edit
-
You’ll be able to add filters to them with out dropping the power to edit them
Sensible object layers may be opened in Digicam Uncooked by double clicking on the layer picture.
4. Masking
As the photographs begin to appear like they might match collectively, I begin the masking course of. Within the image, I take advantage of a number of alternative ways to masks the layers. A lot of the masking was completed with brushes. First, I add a layer of fog, a shot I took on the lake to cover among the branches on the facet of the highway. After I need to use solely a small a part of a picture, I invert the masks with shortcut CTRL/CMD+I and begin brushing with a tender brush with a low circulate. When it appears first rate, I cover and reveal the layer so I can see what it was earlier than and after including the fog layer.
Smoothening the background with one other layer of fog through the use of tender brush and inverted masks.
For the cloud layer, I used a number of pictures to create depth and fluffy look. The cloud picture was only a cloud in a blue sky, so it was simple to take away from the background. I used a cloud brush to create a masks with some tender but detailed edges. I made duplicate of the cloud and rotated it so it will make it look a lot greater and fluffier.
The look of the primary cloud masks.
Making duplicates of the cloud layer and rotating them to make the cloud look extra reasonable.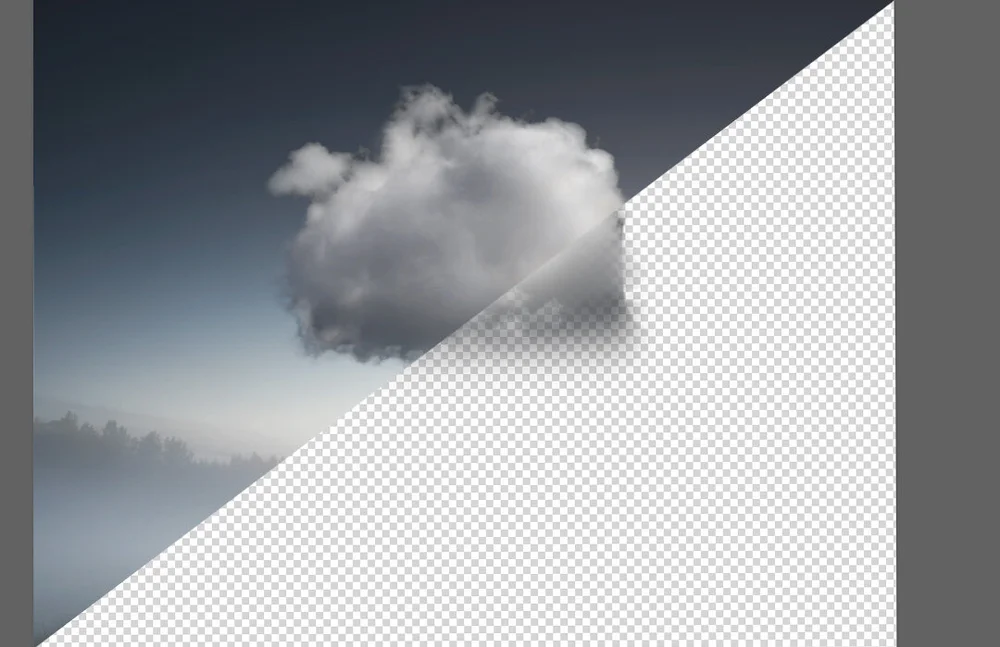
After making duplicates of the cloud.
Masking ideas
-
Use tender brushes to create smoother transitions
-
Invert the masks for those who solely need a small a part of the picture for use
-
ALT-click on the layer masks to see how the masks appears like
-
In case you have many layers as one object, add them to a bunch and masks the entire group to make last changes to the article
5. Creating components
In these kinds of edits the place, for instance, I do not know easy methods to do one thing, I google the impact I need to develop and attempt to study new issues. With the rain, I attempted a few totally different tutorials. Nevertheless, the rain impact was inferior to I needed, so I created a set of brushes which I used to create the rain. I additionally added a rain cloud, which helped to create a extra reasonable look to the purpose the place the rain begins from the cloud.
After including the rain layers.
There have been just a few issues I needed to create, and one was the rain on the highway. I needed to create this sense that the individual and the raincloud had been shifting collectively in the direction of the horizon. So, it will appear like the low a part of the highway was moist from the rain. First, I made a brand new layer and painted black with customized brushes so as to add some darkish areas the place I needed after which added a layer masks as I needed to have this rougher edge to the moist floor. Because it began to look good, I set the mixing mode of the layer to Tender Mild to have this darker impact with out being too overwhelming.
Utilizing Tender Mild mixing mode to make the moist asphalt reasonable.
After the added moist asphalt.
6. Including particulars
When the highway and the rain appeared good, I added the determine. I needed it to appear like the individual was strolling in the midst of the rain, so I needed to place it below the rain layer. After I need to create an in depth masks, I take advantage of the pen software and take my time to go across the topic. As I had made the choice, I created a reproduction of the layer and flipped it vertically to create a mirrored image on the “puddle” on the highway.
Closing piece to the manipulation was so as to add the individual.
As there have been quite a lot of various things I needed to create, I made a bunch of latest brushes to create raindrops hitting the asphalt and the determine.
Utilizing customized brushes to make the raindrops.
7. Closing changes in Lightroom
When creating a photograph manipulation, I normally finish the edit in Lightroom. This time I spent little time going by way of totally different presets and used a one from my Ambiance preset assortment (Ambiance – Down I). And after making just a few modifications within the preset, I added one other preset (Ambiance – Moon I).
Mikko Lagerstedt – Darkish Thougths, 2020
And that is it — a dive into what goes into creating a photograph manipulation from sketch to last piece. I hope you loved the tutorial and if you wish to see extra of those go away a remark beneath, I’d love to listen to your ideas. If you happen to do not need to touch upon the picture, I’d be occupied with studying how you might be dealing with the scenario we reside in proper now?
Keep protected, everybody!
GET THE LATEST
CONTENT FIRST
If you happen to like this submit. Subscribe to be the primary to obtain recent new tutorials straight to your inbox!
We respect your privateness.
Thanks!